

How To Use Paving Jointing Compound
Introduction:
Many of the terms used to describe the jointing and pointing of paving work along with definitions of some of the associated words and phrases which crop up repeatedly are explained on the Terms and Definitions page
There are several means of sealing the joints between paving units: the stop apply and type of unit volition determine the most appropriate method. Many of the nearly popular methods incorporate a cement then create a solid, inflexible joint. This is what is normally referred to every bit "Mortar Pointing" or rigid pointing. An alternative strategy utilises a pure kiln-stale sand, and is typically reserved for flexible block paving , small chemical element paving and some decorative patio flags/slabs.
The first of the linked sub-pages in this section considers the employ of Modified Mortars and of polymeric sand , which is best idea of every bit a special sand that is chemically 'glued together'. The farther page looks at some of the more unusual or esoteric other materials that can be used for jointing special paving or for designer paving.
At that place is also a carve up page detailing a case written report which illustrates the pointing of a flagstone patio using a coloured mortar, and a Product Written report page looking at a range of loftier quality polymeric jointing products from Romex.
There is besides a substantial section that considers the methods and materials used to joint stone pavements of all types. Some of these methods replicate those covered in this section, so there is some inevitable repetition just, in general, the information contained within the 'jointing stone pavements" section is more detailed and up-to-date and then is well worth checking.
- Mortar Pointing - for flags/slabs of all types, and rigid cake paving
- Coloured Mortar Case Study
- Pointing Styles - different forms and styles for mortar pointing
- Re-jointing paving - a case study following the re-jointing of a flagged patio
- Wet Grouting - for some flags/slabs
- Dry out Grouting - for decorative patios
- Dry out sand Jointing - for blocks, small elements and some patios
- Polymeric Sand - for all light-use paving joints wider so 5mm
- Modified Mortars - for wide joints and heavy use applications
- Other Materials - alternative materials for special paving projects
- Romex jointing materials - a product study
- GftK Epoxy Jointing Mortars - product report
- GftK Polymeric Jointing Mortar - product study
- Jointing Stone Pavements - Umpteen pages of methods and materials
Mortar Pointing
This is the nigh common method used for sealing the joints between flags/slabs. It is also used for rigid cake paving and for pointing the joints that occur betwixt sectional kerbs and edging units.
Timing
Ideally, when working with paving that has been laid on a cement-leap bed and or with buttering mortar, the pointing should be undertaken within 4 hours of the paving beingness laid, while the joints still take fairly fresh mortar within them from the buttering process. The pointing will 'acme-upward' the buttered mortar to course a solid mass with no twenty-four hours articulation betwixt butter mortar and pointing mortar.
Nonetheless, if the pointing has been delayed for some reason, the joints should be checked earlier the work commences and any detritus or litter removed. 'Catch-up' pointing is best undertaken as soon as possible subsequently the paving has been laid, and should be done on a fine twenty-four hours, when there is no adventure of rain or frost.
Note that on very hot days, when undertaking 'catch-upwards' pointing, the relatively small-scale corporeality of mortar used in each joint can dry too apace and crumble to grit in the space of a week. The biggest cause of pointing failure is uncommonly 'thirsty' flags sucking the essential moisture out of the pointing mortar earlier information technology has a chance to set properly. Past hosing down the flags a few hours before pointing, information technology quenches their thirst and gives the mortar a better hazard. On such days, information technology is best to leave the work until late afternoon or early evening.
Make sure the paving is dry on the surface earlier commencing the mortar piece of work, as very clammy or moisture paving is more likely to stain.
Preparing the mix
The mortar should be a Class Two and made up in accelerate as shown on the mortars folio. It should exist just clammy enough so that it clumps into a ball when compressed in the hand, but no h2o should dribble out between the fingers. The 'wetness' of a mortar or physical is properly referred to every bit its "slump" and most mortars have a depression slump value, ofttimes 20mm or less, ie, they are fairly 'potent'.
Never mix more than most a barrowful at once, as the mortar starts to harden quite quickly and pointing can be slow work. The use of a plasticiser for pointing mortars cannot be recommended as well highly - it makes the task 10 times easier.
The Pointing Process
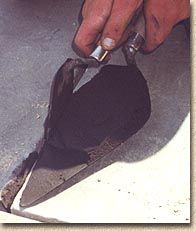
Load some of the mortar onto a large brick trowel, and trim any overhang to preclude mortar spillage and stains. Assuming you lot're correct-handed, hold the loaded brick trowel in your left paw forth the articulation y'all wish to point. Using a smaller pointing trowel, feed the mortar into the joint, being careful to avoid excessive staining on the edges of the flags/slabs.
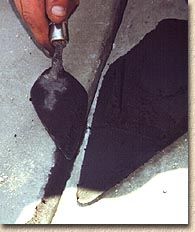
Pack downward the mortar with the edge of the pointing trowel until the section of joint is filled. Motility along the joint and repeat the operation until the entire joint has been filled with mortar.
If you are unsteady or determined to minimise whatsoever possible staining, the edges of the articulation tin can be masked with cardboard or 4mm plywood, moving the mask along every bit you work.
Next, strike (polish) the mortar past running the border of the pointing trowel at a slight angle along the top of the filled joint. Alternatively, the mortar can exist 'polished' with a rounded, or fifty-fifty a Five-shaped, pointing bar, which can be fashioned from a short length of copper tube.
At one time, information technology was thought that striking a mortar articulation was purely corrective, but it is now known that the striking activity helps harden the mortar and make it less susceptible to frost or water damage.

Allow the mortar to become quite dry, say 1 hour or thereabouts on a fine, simply non hot, twenty-four hours. Use a soft brush to sweep Across the joint to dust off whatsoever mortar left on the surface of the flags/slabs. Collect upwards the sweepings and dispose. Re-strike the joints if required while the mortar has nonetheless not fully set.
On very hot days, we find it helps to shade the freshly pointed flags with lengths of timber, hessian sacking or whatever we can discover that will keep the direct sun off the joint, causing to mortar to dry too quickly.
This mortar should showtime setting within 2 hours, faster in summer, slower in winter. Information technology should be protected from foot or vehicle traffic for at to the lowest degree 48 hours.
Wash off all tools when finished - mortar is much easier to remove when notwithstanding moisture than when it has set.
Wet Grouting - aka Slurry Grouting
This is a method rarely used to seal the joints between flags except on larger scale projects, when atmospheric condition favour its utilize, only information technology is a adequately common technique for jointing setts and cubes , which tin have several linear metres of joint per foursquare metre of paving. For flags, it is most often used on public footpaths, where a pristine and perfectly clean terminate is not required but where a large expanse of paving has to be firmly jointed in a limited amount of time. It is also a useful technique for re-jointing an existing pavement that has several units that 'rock' or 'wobble' when trafficked.
Information technology is non recommended on textured paving, or on any decorative paving where the appearance of the surface end is paramount, as it can exit a sparse veneer or "haze" of cement over the surface, which volition weather away over time merely is non to everyone's gustatory modality.
There are two sets of weather conditions that suit this method of sealing; damp or moisture weather, and blistering hot days. Conveniently, these are probably the ii worst conditions for mortar pointing, so, between the two methods, there's usually some way of sealing the paving regardless of atmospheric condition; snow and frost being the obvious exceptions.
The method relies on making a mortar slurry, ie, a very, very moisture mix, with the consistency of a hearty pea soup. This slurry is brushed over the paving and into the joints. After a curt period of time, commonly 20 minutes to an hour, the excess is removed from the surface and the jointing struck or polished.
A Class Two mortar is prepared as detailed on the Mortars page, although a plasticiser may exist omitted. If it is not already wet, the surface of the paving is soaked with water from a hose - not only dampened, not simply wetted, merely absolutely SOAKED. A very generous corporeality of pre-mixed mortar, about a half barrowful at a time, is dumped on the paving and very roughly distributed over the expanse using a spade or shovel.
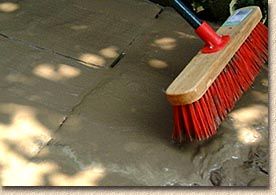
When a suitable patch, say 10m², is ready, the hose is once again brought into play, and used to saturate the mortar on the paving, brushing all the while, keeping the slurry in move to finish the sand and cements from separating, while simultaneously guiding it into the joints. Once all the joints are filled, any surplus tin be moved on to the next section or removed from the area.
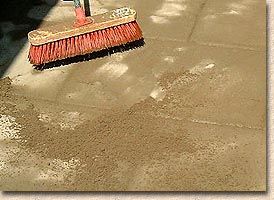
Using a stiff castor, the area should then be repeatedly swept, at an bending of 45° to the direction of the paving joints, to progressively remove progressively more and more than of the surplus mortar slurry.
In hot weather, the surface area can exist hosed down, or left to dry in the sun, as long every bit the brushing continues more or less non-stop. If the "allow to dry" option is taken, repeated brushing ensures that no thickness of mortar is permitted to build up and 'adhere' to the paving, and whatever surplus gradually turns to grit, which is best removed by changing to a soft brush and sweeping again. This dry residue should non be re-used unless mixed with fresh cement.
Hosing downwardly is often used in damp or wet weather. The slurry is given a period of time to settle, and and so the hose is played onto the surface at a shallow angle while a stiff brush is used to sweep the surplus off the paving. At no time should the hose exist directed onto a joint, as information technology will just boom out the mortar. It is important to hose down the surface area as thoroughly equally possible - the cement is very fine-grained and tends to hang much more readily than do the sand grains. If they are not removed, they will prepare and stain the paving.
Finally, the joints are struck with the border of a trowel or a pointing bar, topping upward any joints that have settled.
Every bit was mentioned earlier, this method of jointing is a useful technique on pavements that have a few loose elements, as the slurry seeps into places a normal mortar would never reach, filling voids and replacing lost bedding, and, hopefully, stabilising the pavement without having to undertake a complete "lift and re-lay" exercise.
Notwithstanding, it should be noted that considering such a large quantity of water is used with this method of jointing, the strength of the mortar will be adversely affected. This is not a large result on small-scale residential patio or driveway projects, merely on commercial and/or borough paving schemes where joint mortar force is critical, and so a stronger starting mortar should be used to offset the loss of strength due to the loftier water:cement ratio (w/c ratio - see Concretes page for fuller caption). For projects where joint strength is critical, proprietary "high water content" mortars are available for utilize as a slurry jointing medium.
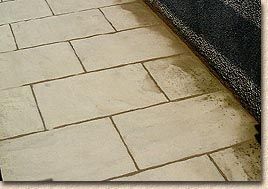
Dry out Grouting
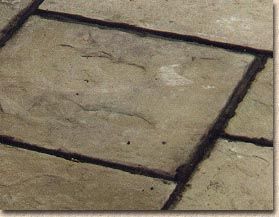
This is a variation on the wet grouting method described higher up, and tin only be carried out when the surface of the paving is perfectly dry. Information technology is a common method of jointing decorative patio flags, where a wet grout or a mortar pointing would cause unacceptable staining, and is sometimes used on public footpath works where the flags take been ' buttered ' with mortar prior to laying. On most flagging projects, it is a like shooting fish in a barrel mode to seal the paving effectively and keep the surface staining to a minimum, as long as the joints were buttered and the mortar used to butter the joints is still relatively fresh (less than an hour old). It is less satisfactory when the flags are dry- or butt-jointed, as the dry mixture does not to bail to the edges of the joints.
The 4:i mortar mixture is mixed dry - no water is added at all, and it is essential that the sands and cement are thoroughly mixed together in the dry out state before handful onto the dry paving surface, and so using a soft brush to sweep the mix into the joints. Once an area has been covered, every joint is forcibly struck with the border of a trowel to pack down the dry mix into the joints, and the process is repeated as required. Sweeping at an bending of 45° to the management of the paving joints prevents the mix from being swept out of the joint. All surplus mix should be swept off and disposed, it can be re-used to seal other areas, if required, every bit, unlike the wet grout above, the cement content has non been wetted and is therefore withal relatively fresh.
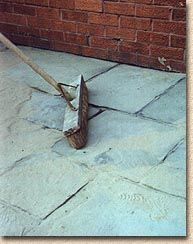
One time all the joints are filled, some contractors prefer to sprinkle the area with a fine spray to dampen the mixture within the joints, only nosotros find this tends to splash some of the mix onto the paving surface.
Nosotros only employ this dry grouting method with freshly buttered joints, where find that at that place is sufficient moisture from the 'proper' mortar to initiate setting of the dry mix. Dry out mix into dry joints rarely, if ever, produces a good joint
Dry Sand Jointing
This method is used on all flexible block pavements, and on pavements constructed using small chemical element pavers. Information technology is also used with some decorative patio flags where a mortar joint is not required.
3 of import points to notation:
- there is NO cement used: None, zilch, zero, goose egg, goose egg, neamhní, nowt.
- the sand used is peculiarly selected
- the surface must be dry
Building sand, playpit sand, beach or river sand, grit, coarse, bedding, soft and plastering sands are not commonly suitable. The sand to exist used consists of grains that fall within an upper and lower size range, to ensure maximum interlock betwixt grains.
The table opposite is taken from Table D4 in BS7533:Part 3 and gives the grain size limits, but you'll be relieved to know that the aggregate companies have very kindly done all the sieving and sorting on your behalf, used a kiln to thoroughly dry the sands that pass muster, and and so packed the results into convenient, if pricey, 25Kg polythene sacks, which are obtainable from most Builder's Merchants for £3 - £5 per handbag.
If the sand is clammy, don't have it. Information technology needs to be bone dry to 'flow', and you can become damp sand for a fraction of that price!
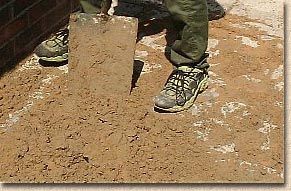
The surface must be dry otherwise it will merely dampen the sand, preventing it from flowing freely into the joints. We apply a wide-headed soft brush to spread the sand and hunt it into the joints. On block paving, some contractors like to leave a pocket-size surplus of sand on the surface before compacting with a vibrating plate, so that when the plate compactor 'shakes' the sand grains downwards tight into the joints, the surplus will be vibrated into the partially-emptied joints to ensure they are full. Properly filled joints provide the interlock that is needed to agree the paving firmly in place. Nevertheless, there is an issue using this strategy with some jointing sands, because the grains can be crushed onto the surface of the blocks which can consequence in a near-permanent 'spot' stain, and and then it is usually recommended that surplus sand is removed prior to consolidation to avoid just this problem. Boosted sand, needed to peak-up any 'hungry' joints, tin be spread over the surface following consolidation.
Obviously, a vibrating plate compactor isn't suitable for use with near patio flags and then we have to rely on gravity and pes traffic to settle the jointing sand.
In one case all the joints are full, any surplus sand is swept off and the job is complete. All sand joints, regardless of type of paving, should be checked after 4-6 weeks, every bit there is ever some slight settlement that results in a small number of empty or partially-empty joints. Additional kiln-dried sand should be brushed-in as required. Subsequently three-vi months, the sand will seal itself with detritus on the surface and go virtually impermeable. Empty joints issue in loose paving, so it is essential that sand joints are kept total.
Stabilising Compounds and Liquids
This section has been moved to this folio
Associated Pages
Source: https://www.pavingexpert.com/pointing
0 Response to "How To Use Paving Jointing Compound"
Post a Comment